table of contents
Common Menu
Notifications
Lesson/Self-study screen
Notebook screen
Edit sticky note screen
Save sticky note screen
License information screen
Account Setting screen
Getting help
Notes on Using Your Browser
Common Menu
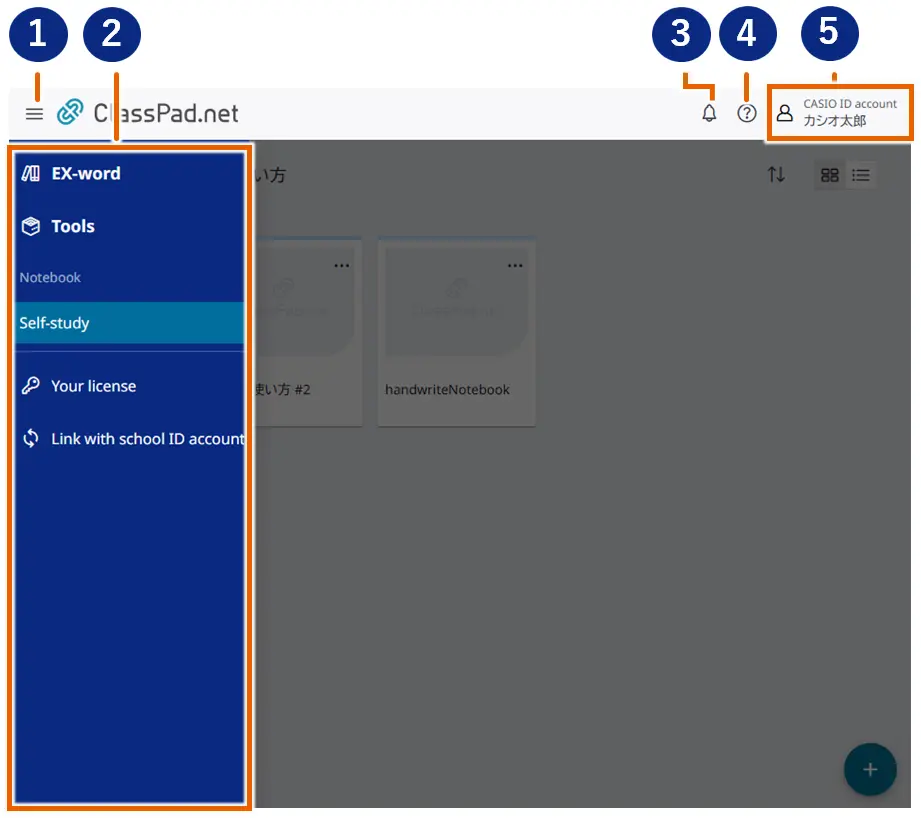
The following sections explain icons displayed in the upper part and the left pane on ClassPad.net.
| 項番 | 項目 | 内容 |
|---|---|---|
| ① |  |
This icon is displayed on the narrow display such as one of a smart phone. Selecting it shows/hides the left pane menu. |
| ② | left pane menu. | Menu items such as “EX-word” and “Notebook” are lined in a single column. |
| ③ |  (Notifications icon) |
Notifications from ClassPad.net will be displayed. The red badge tells you there is a newly received notification.See “Notifications” for details. |
| ④ |  (Help menu) |
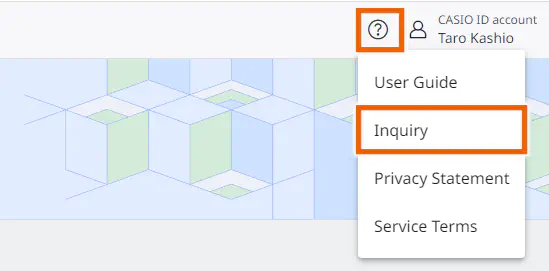
The following Help menu will be displayed. User Guide … displays the user guide for ClassPad.net. Inquiry … displays the inquiry form for ClassPad.net. See “Getting help” for details. Privacy Statement … displays the Privacy Statement for ClassPad.net. Service Terms … displays the Service Terms for ClassPad.net. External Transmission of User Information … displays the page of External Transmission of User Information. |
| ⑤ |  (Account menu) (Account menu) |
Menu related to your account will be displayed. Account settings … displays information of the account currently logged in. See “Account Setting screen” for details Log out … logs out of ClassPad.net. |
Notifications
You can check the notifications from ClassPad.net.
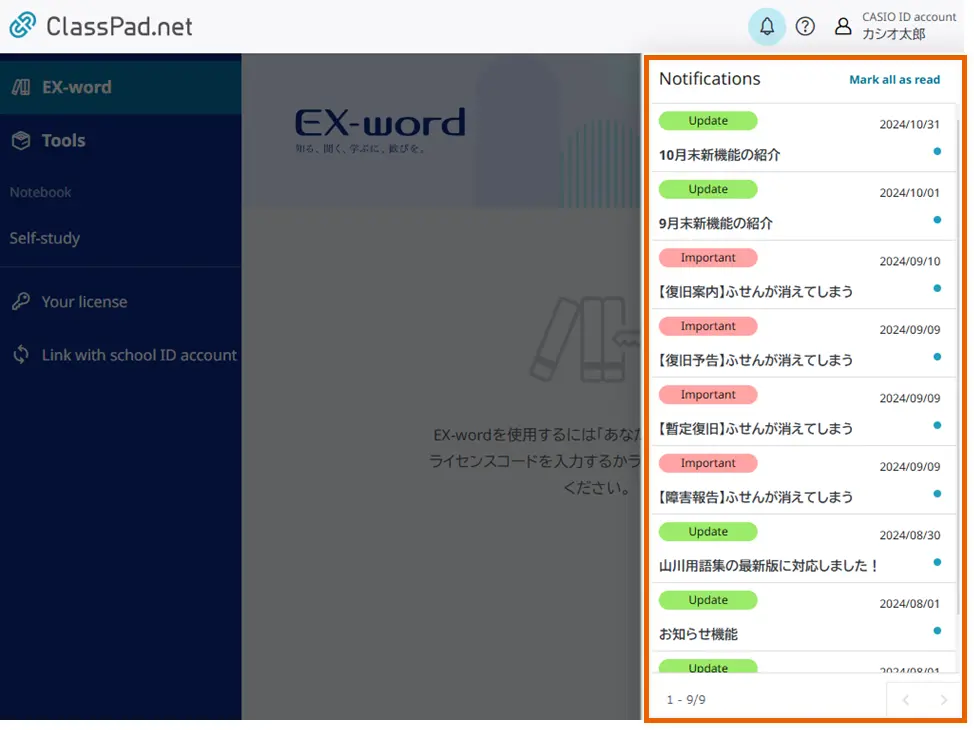
Selecting  displays the list of notifications.
MEMO
An unread notification is displayed with  on the right and its title is in bold.
Selecting [Mark all as read] makes all unread notifications read.
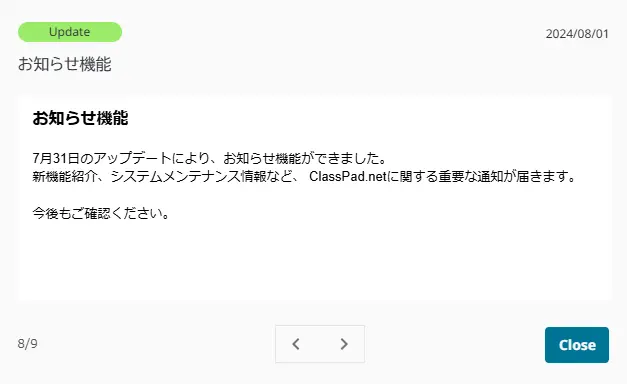
Selecting the notification you want to read opens its details screen.
MEMO
Selecting [ ] shows a previous notification, and [
 ] shows a next notification.
Selecting [Close] closes the details screen.
Lesson/Self-study screen
Can be used to create a new notebook or open an existing notebook. You can also sort and display your notebooks by name or by date.
The menu on the left side of the Lesson screen shows the lesson content registered by the administrator.
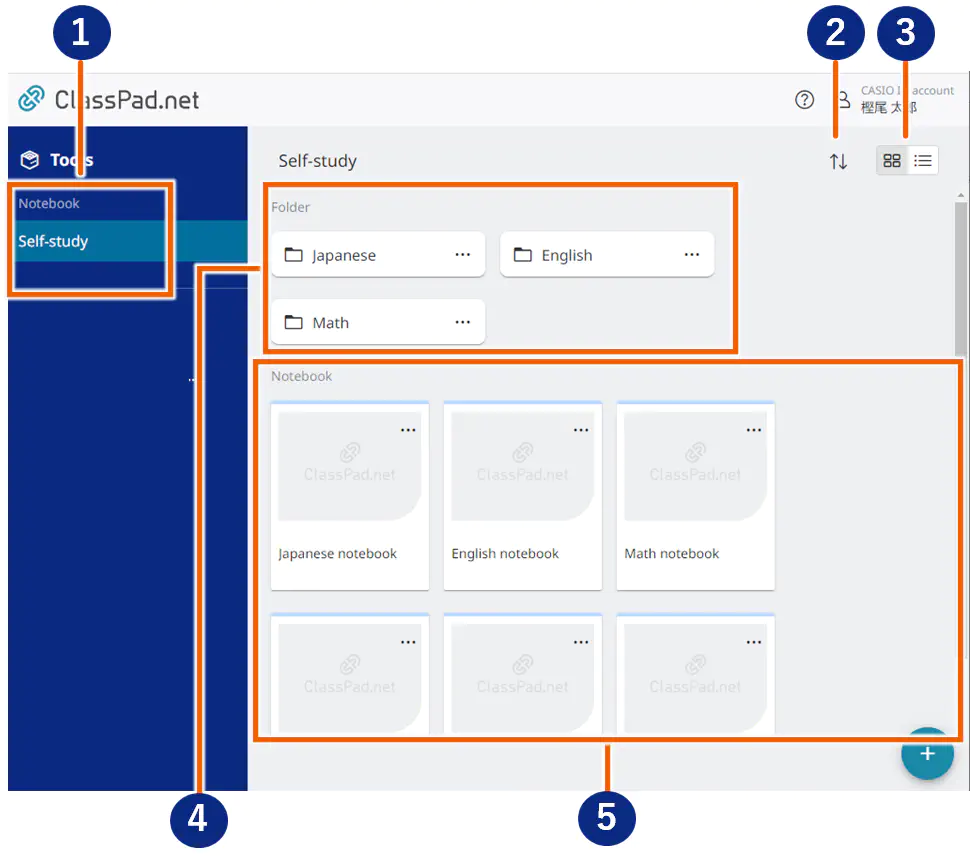
| No. | Item | Details |
|---|---|---|
| ① | Class/Lesson menu | Shows the class name and lesson name registered by the administrator. Selecting an item displays the lesson folder and a list of notebooks. |
| ② |  |
Changes the display order for notebooks and folders. |
| ③ |  |
Switches the Lesson/Self-study screen between thumbnail display and list display. |
| ④ | Folder list | Shows the registered folders. Selecting a folder displays the files in that folder. |
| ⑤ | Notebook list | Shows the thumbnails for registered notebooks. Selecting a thumbnail displays that notebook. |
MEMO
Created notebooks can be organized for each folder.
Notebook screen
Content such as text, handwritten text and entries retrieved from a dictionary can be pasted into notebooks as sticky notes.
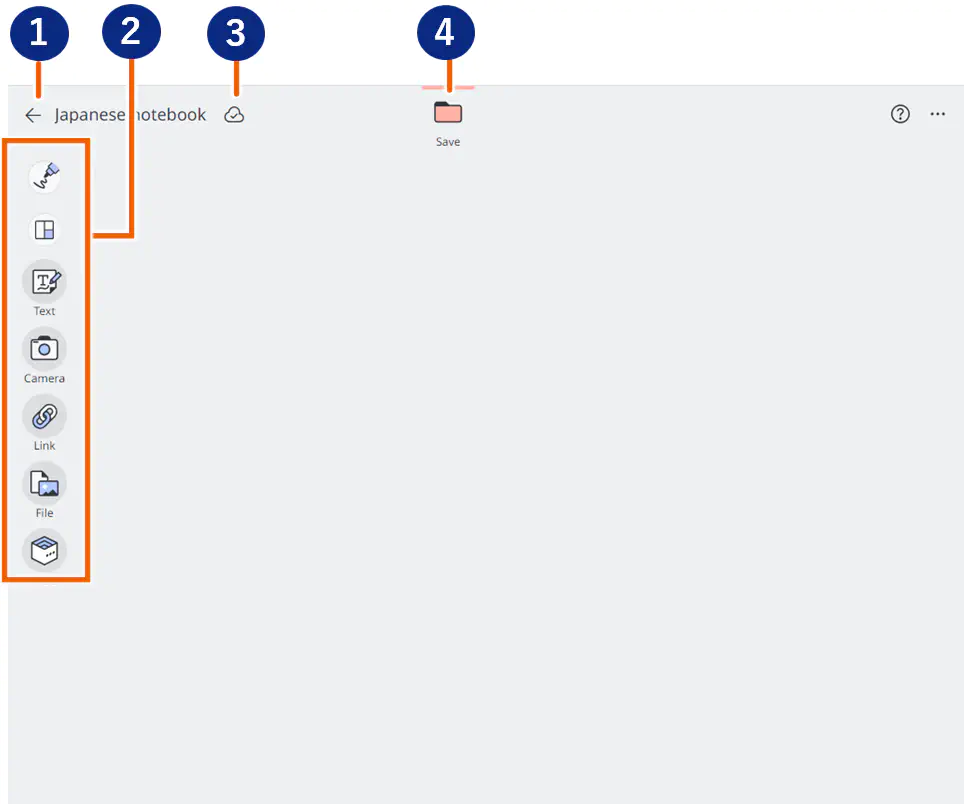
| No. | Item | Details |
|---|---|---|
| ① |  |
Returns you to the Lesson/Self-study screen. |
| ② | Notebook menu | Selecting an item creates a new sticky note for the selected content. |
| ③ |  (Saved) (Saved) |
Saves the content in the notebook. |
| ④ |  (Save) (Save) |
Saves the created sticky note in a folder. |
| ⑤ |  (Zoom in/out) (Zoom in/out) |
Zooms in and out on a notebook. You can also zoom using the following methods: ・On a computer, hold down the “Ctrl” key and use the mouse wheel, or use the “Ctrl” key + the “+”/“-” buttons |
Edit sticky note screen
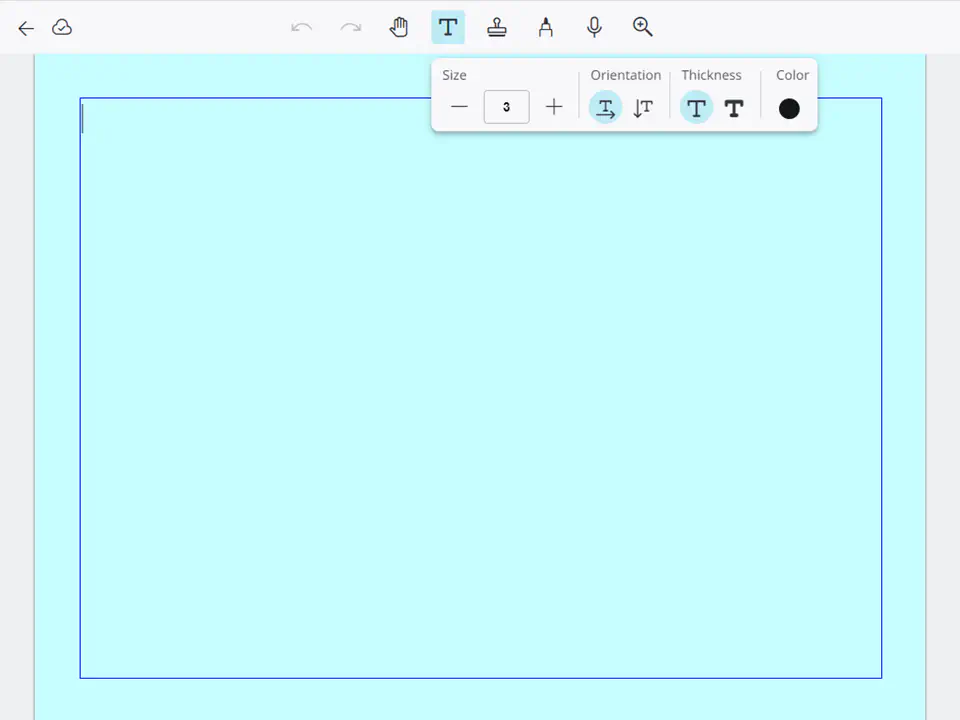
You can use this screen to edit sticky notes pasted into a notebook, such as by changing the fill color, text size or text color.
MEMO
The items you can edit vary depending on the type of sticky note.
Save sticky note screen
Dragging and dropping a sticky note to [ ] (Save) in the Notebook screen or selecting [Save] from options in the sticky note selection menu displays the [Save sticky note] screen.
Created sticky notes can be saved in folders.
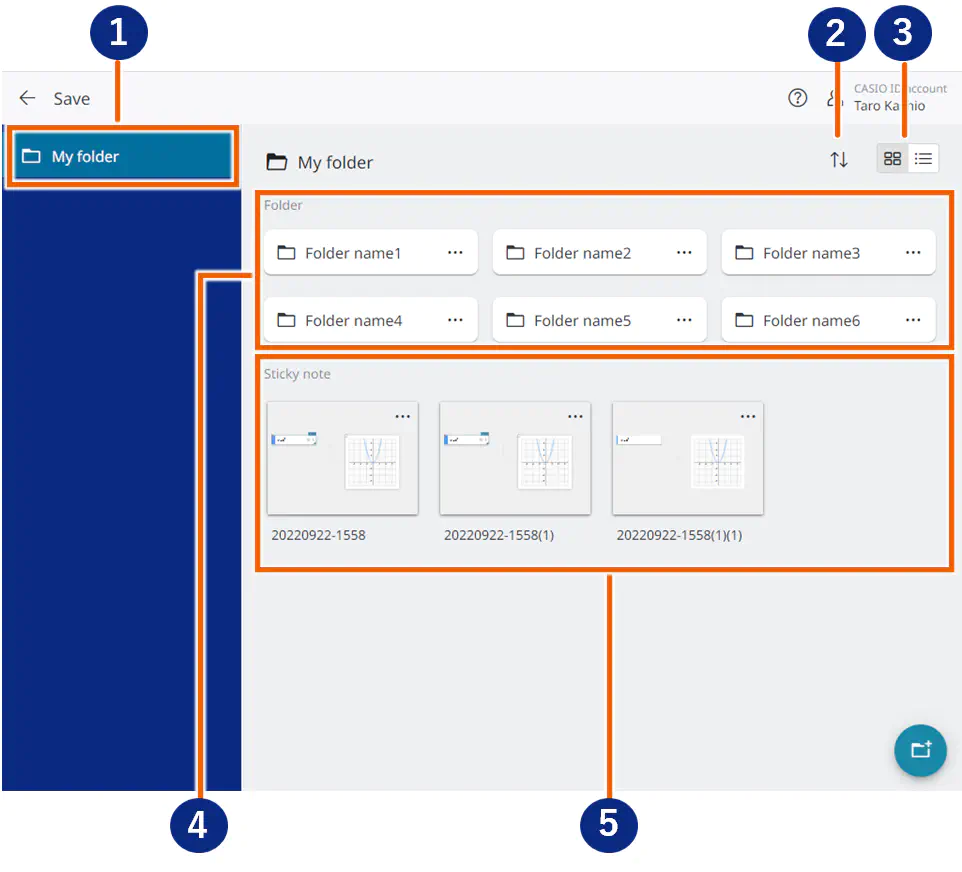
| No. | Item | Details |
|---|---|---|
| ① | Folder list | Shows the registered folders. Selecting a folder displays the files in that folder. |
| ② |  |
Changes the order in which folders/sticky notes are displayed. |
| ③ |  |
Switches the Save sticky note screen between thumbnail display and list display. |
| ④ | List of folders in a folder | Displays the folders inside the folder selected in the folder list. Selecting a folder displays the files in that folder. |
| ⑤ | Sticky note list | Shows the thumbnails for saved sticky notes. Selecting a thumbnail displays the sticky note on the notebook. |
License information screen
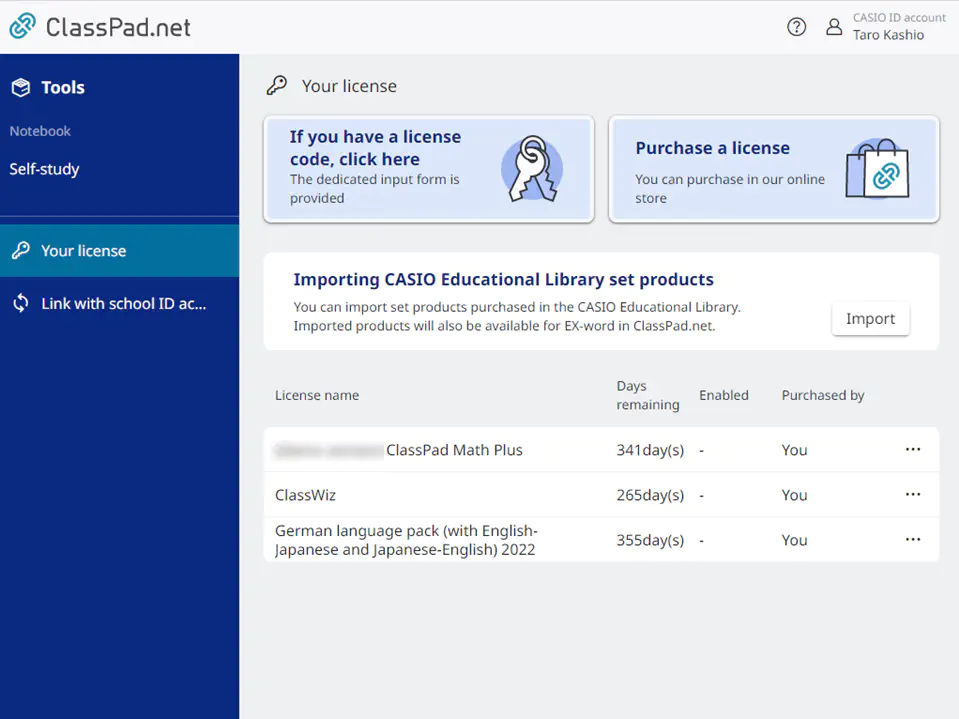
Allows you to check the license information for content.
MEMO
Select [Details] from options to display the license details dialog.
If you logged in using your CASIO ID, [Enter license code] appears. You can enable content by selecting [Enter license code], entering the license code and then selecting [Enable].
When the days remaining for a license reach 90 days, an alert appears beside the [Your license] menu item.
On the details window of the license for batch school users, the currently used number of licenses and the total number are displayed in [Enabled].
Individual users only:
If a license update is available, [Check for updates] appears beside the license name. Select [Check for updates] and update your license.
Account Setting screen
Select the account menu in the top-right corner of the License information screen and select [Account settings] to display the [Account settings] screen.
- Users with a personal ID (CASIO ID)
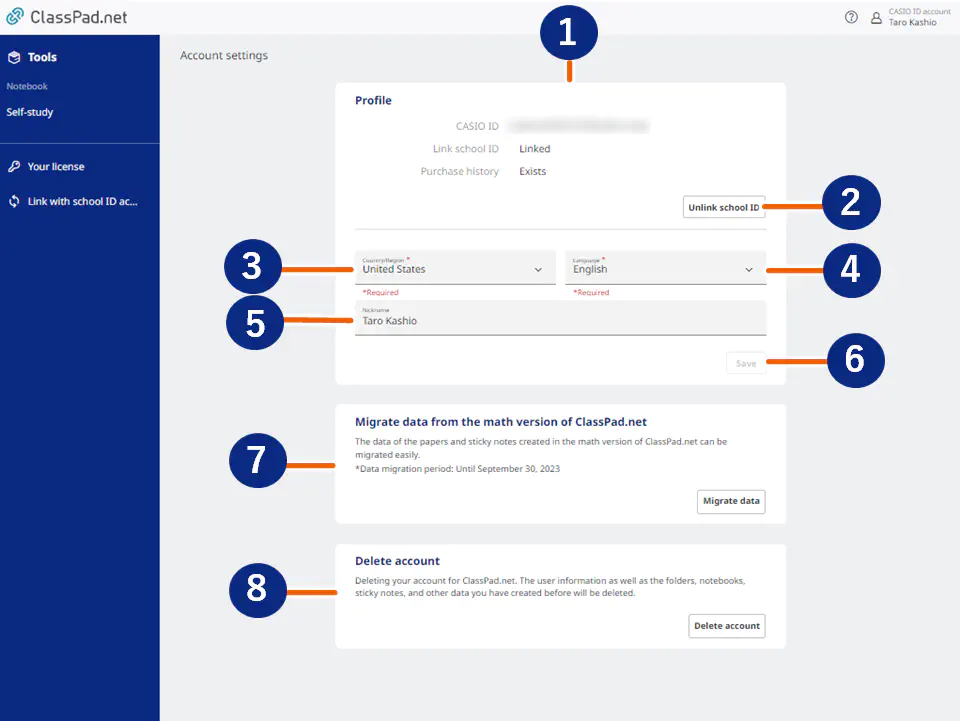
| No. | Item | Details |
|---|---|---|
| ① | Profile display | This screen shows the account information below. CASIO ID: This is your CASIO ID (email address). Link school ID : Not currently supported. Purchase history: “Exists” — Purchase history found. “None” — No purchase history found. |
| ② | Unlink School ID (button) | Not currently supported. |
| ③ | Country/Region | Your country or region set in your CASIO ID account is displayed.You cannot change it. |
| ④ | Language | Changes the language when this service is used. |
| ⑤ | Nickname | Enters or changes your nickname. |
| ⑥ | Save (button) | After you have changed ④ and ⑤, select this button to save the changes. |
| ⑦ | Migrate data | For details, see “Learn by linking data with electronic dictionaries”. |
| ⑧ | Delete account | Deletes your ClassPad.net account. Important! ・ Deleting your account deletes all the data you have created so far, including your folders, notebooks, sticky notes, as well as any licenses (content) you purchased. ・ Even if you delete this account, you can continue using other CASIO ID services. |
MEMO
If you’re using this service on your smartphone, there are only “Profile” and “Delete account” in Account settings.
Getting help
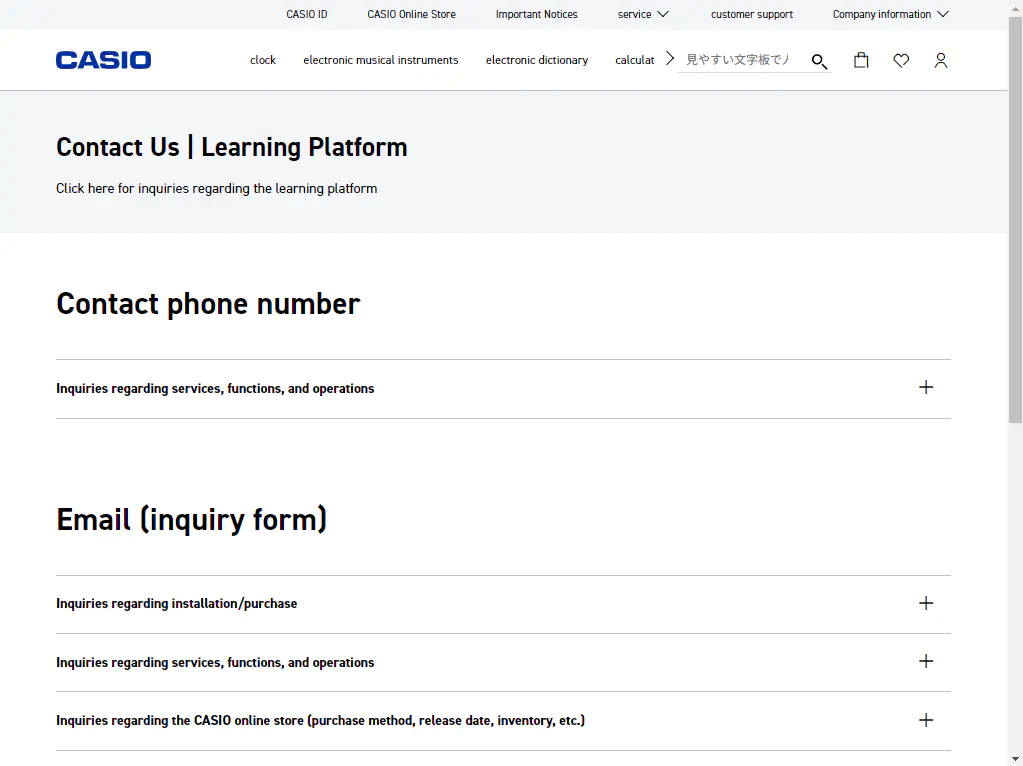
If you have any difficulties with operations, etc., you can contact us from various forms on the inquiry page.
Select [Inquiry] from the  icon.
icon.
The ClassPad.net inquiry page appears.
MEMO
[Inquiry] in  is displayed only if you are using the service in Japan.
[Inquiry] is not available if you used the external service linkage function for login.
Notes on Using Your Browser
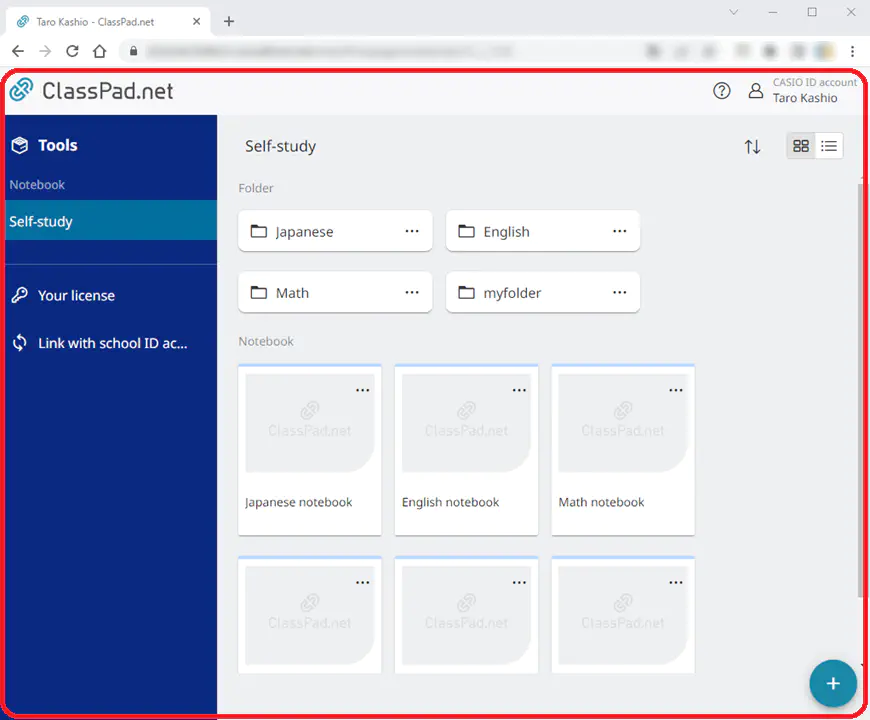
Because this service does not support browser functions such as [Back] and [Reload], use only the functions inside the red frame.
